How to Start a Beehive in Florida: Step-by-Step Guide
So you've decided to start a beehive in Florida. Congratulations—you're about to join one of the most rewarding hobbies in the world. Backyard beekeeping lets you support local pollinators, harvest your own honey, and connect with nature in a unique way.
But where do you actually begin? Buying bees and a box isn't quite enough. At The Other Bee Guy, we've helped hundreds of new Florida beekeepers get started, and we've created this practical, step-by-step guide to walk you through the entire process.
If you're brand new to the hobby, also check out our broader beekeeping for beginners guide for foundational info.
Step 1: Check Local Regulations First
Before you spend a dime, make sure you can legally start a beehive in Florida at your location.
Florida State Requirements
- All hives must be registered with the Florida Department of Agriculture (FDACS)
- Registration is free for hobbyists
- Annual inspections are required
- Hives must use moveable frames
Local Requirements
- HOA rules: Many HOAs prohibit beekeeping—check first
- City ordinances: Some Florida cities limit hive count or location
- Setbacks: Many municipalities require hives to be a certain distance from property lines
A 10-minute phone call to your county extension office can save you a lot of trouble.
Step 2: Choose the Perfect Hive Location
For successful backyard beekeeping, location is everything. The ideal Florida hive site has:
Sun and shade balance:
- Morning sun to warm the hive
- Afternoon shade to prevent overheating
- Light dappled tree cover is ideal
Practical features:
- Easy access for inspections
- Stable, level ground
- Protected from wind
- Near a water source (or you can add one)
- Away from high-traffic foot paths
Florida-specific tips:
- Avoid low-lying areas that flood
- Elevate hives 12–18 inches off the ground
- Consider hurricane risks—use anchor straps
- Provide a windbreak for storms
Direction Matters
Face hive entrances southeast. This catches morning sun and encourages early foraging.
Step 3: Gather Your Equipment
Here's the complete shopping list to start a beehive in Florida:
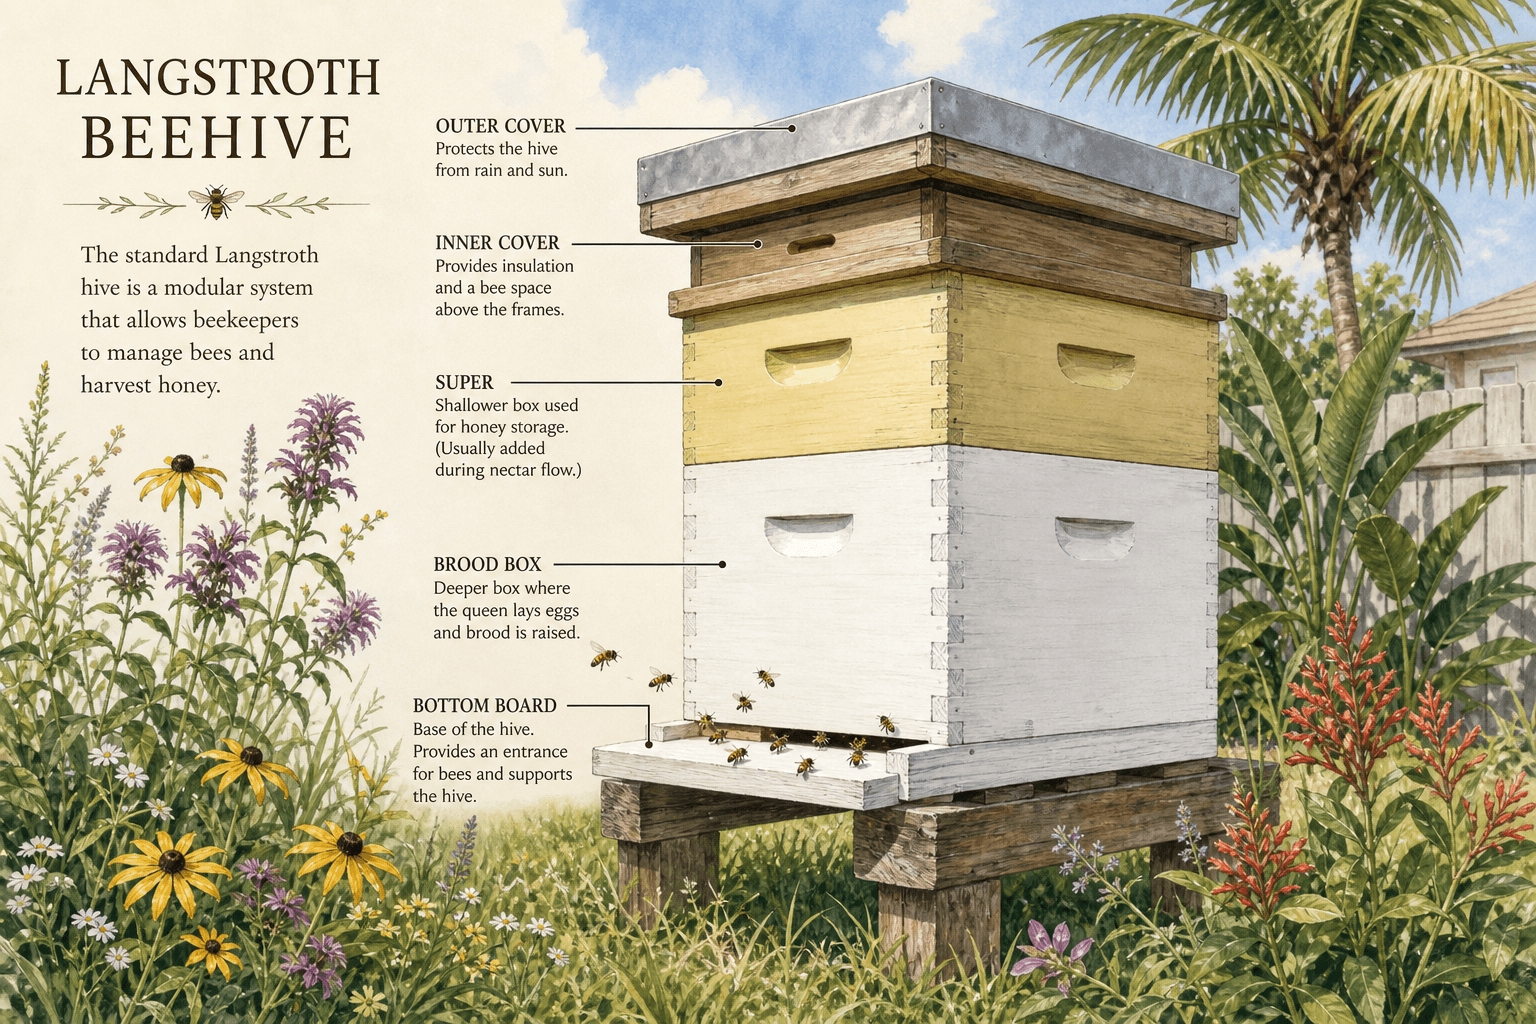
Hive Components (Langstroth Setup)
- 1 bottom board (screened recommended for ventilation)
- 2 deep brood boxes (or 3 medium 8-frame)
- 2 medium honey supers
- 20 frames with foundation per box
- 1 inner cover
- 1 telescoping outer cover
- Hive stand (or cinder blocks)
Protective Gear
- Full beekeeping suit or jacket with veil
- Ventilated suit (great for Florida heat)
- Goatskin or nitrile gloves
- Closed-toe boots
Essential Tools
- Smoker with fuel
- J-hook hive tool
- Bee brush
- Frame perch or grip
- Entrance reducer (critical for new hives)
- Top feeder or entrance feeder
Florida-Specific Items
- Small hive beetle traps
- Screened bottom board
- Mite testing kit (sugar roll or alcohol wash)
- Hive strap for hurricane prep
Total cost estimate: $500–$800 fully outfitted, including bees.
Step 4: Set Up Your Hive Stand and Boxes
Before your bees arrive, assemble and place your equipment.
Setting Up the Stand
- Choose your spot and level the ground
- Place cinder blocks or a sturdy stand 12–18 inches high
- Make sure the stand is solid—a tipped hive is a disaster
- Place legs in ant-deterring oil cups
Assembling the Hive
- Bottom board goes on the stand first
- Slide in the entrance reducer (smallest opening for new colonies)
- Place one brood box on the bottom board
- Add 10 frames with foundation
- Top with inner cover, then outer cover
Don't add the second brood box or supers yet—your colony will need to grow into them.
Step 5: Source Your Bees
You can't start a beehive in Florida without bees! There are three main ways to get started:
Option 1: Nucleus Colony (Nuc) — RECOMMENDED
A nuc is a small, established colony with 4–5 frames of bees, brood, and a laying queen.
Pros:
- Easier for beginners
- Faster colony buildup
- Local genetics (if bought in Florida)
- Queen is already accepted
Cost: $180–$275
We sell quality Florida nucs—check our bee nucs page for current availability.
Option 2: Package Bees
A 3-pound box of loose bees with a separate queen.
Pros:
- Lower cost
- Wider availability
Cons:
- Slower start
- Queen acceptance can fail
- No drawn comb
Cost: $150–$200
Option 3: Catch a Swarm
Free bees from swarm traps or local swarm calls.
Pros:
- Free!
- Adventurous
Cons:
- Unpredictable genetics
- Can include Africanized bees in Florida
- Not recommended for total beginners
Step 6: Install Your Bees
Installation day is exciting—and a little nerve-wracking. Here's how to do it right.
Installing a Nuc
- Place the nuc next to your hive in the morning
- Open the entrance and let them orient for an hour
- Suit up and light your smoker
- Open your hive and remove 5 frames from the middle
- Carefully transfer the 5 nuc frames into your hive (keep the order)
- Refill remaining slots with empty frames
- Close up and feed sugar syrup
Installing a Package
- Spray the package lightly with sugar water
- Remove the queen cage (don't release her yet!)
- Hang the queen cage between two middle frames
- Shake or pour the bees into the hive
- Close up gently
- Check after 5–7 days to confirm queen release
Step 7: Feed Your New Colony
New colonies need extra food to build comb and grow. Feed sugar syrup until they're established.
Spring/Summer Feed: 1:1 Syrup
- 1 pound sugar : 1 pound water
- Stimulates comb building and brood rearing
Fall Feed: 2:1 Syrup
- 2 pounds sugar : 1 pound water
- Builds winter stores
Pro tip: Stop feeding when honey supers are added so harvested honey is pure floral nectar.
Step 8: Your First Inspections
Wait 7–10 days after installation, then inspect weekly during your first month.
What to Look For
- Eggs: Queen is laying (great sign!)
- Brood pattern: Solid pattern = healthy queen
- Comb construction: Are they drawing out new comb?
- Food stores: Enough nectar and pollen?
- Pest activity: Beetles, mites, ants?
What NOT to Do
- Don't inspect during rain or cold
- Don't inspect every day (stresses bees)
- Don't open the hive without smoke
- Don't squish the queen!
Step 9: Manage Florida-Specific Challenges
Backyard beekeeping in Florida comes with unique pest pressures.
Small Hive Beetles
- Use beetle traps in every hive
- Maintain strong colonies (weak hives get overrun)
- Avoid mushy beetle larvae in honey supers
Varroa Mites
- Test mite levels monthly
- Treat with oxalic acid or formic acid when needed
- Untreated mites will kill your colony
Heat Stress
- Provide ventilation (screened bottom boards, inner cover spacing)
- Ensure water source within 50 feet
- Use light-colored hive paint
Hurricane Season
- Strap hives down with ratchet straps
- Anchor stand to ground
- Move hives if catastrophic flooding is expected
- Keep emergency supplies ready
Step 10: Plan for Year One
Your first year of backyard beekeeping is about learning and building.
Year 1 Realistic Expectations
- Spring: Colony grows, builds comb
- Summer: Population peaks, maybe a small honey crop
- Fall: Prepare for cooler months, treat for mites
- Winter: Mild Florida winters mean minimal management
Don't expect a big honey harvest your first year—your bees need to store enough for themselves first.
When You Need Help
Beekeeping has a learning curve, and every new beekeeper hits a snag eventually. Whether you need help with a struggling colony, a swarm landing on your property, or sourcing local bees, The Other Bee Guy is here to help.
We sell starter nucleus colonies, provide bee removal services, and offer mentorship for new Florida beekeepers. Contact us anytime with questions.
Final Thoughts
Learning how to start a beehive in Florida is the beginning of an incredible journey. You'll make mistakes, lose bees, and feel overwhelmed at times—but you'll also experience the magic of watching a colony thrive, harvesting your own honey, and contributing to pollinator health.
Welcome to the wonderful world of backyard beekeeping. We can't wait to see what you build!